

Indoor Grow Tent Setup Guide for Beginners (Step-by-Step)
Setting up an indoor grow tent is one of the easiest and most effective ways to grow plants indoors. A well-designed grow tent allows you to control light, temperature, humidity, and airflow, creating the perfect environment for healthy plant growth.
In this beginner-friendly guide, we’ll walk you through everything you need to know about setting up a grow tent, including the equipment you need and the correct installation steps.
Why Use a Grow Tent?
Grow tents create a controlled indoor ecosystem for plants. Unlike growing directly in a room, tents help maintain optimal conditions.
Key benefits of using a grow tent:
- Reflective interior improves light efficiency
- Better temperature and humidity control
- Keeps pests away
- Helps contain odors
- Maximizes plant growth indoors
For beginners, grow tents are the easiest way to start an indoor garden.
Essential Equipment for a Grow Tent Setup
Before assembling your grow tent, make sure you have the following equipment.
Basic grow tent setup includes:
- Grow Tent
- LED Grow Light
- Inline Fan
- Carbon Filter
- Ventilation Ducting
- Oscillating Fans
- Timer for Lights
- Pots or Hydroponic System
- Thermometer / Hygrometer
Most beginners choose complete grow tent kits, which include most of these components.
Understanding the Grow Tent Environment


A grow tent works by creating a controlled airflow system:
Fresh air enters through intake vents
- Inline fans remove hot air
- Carbon filters remove odors
- Oscillating fans circulate air inside the tent
Proper airflow prevents heat buildup, mold, and weak plant stems.
Step-by-Step Grow Tent Setup
Step 1 – Assemble the Grow Tent Frame
The first step is building the frame.
Most grow tents include:
- Metal poles
- Corner connectors
- Mylar reflective fabric
Setup process:
- Connect the base frame
- Install vertical support poles
- Attach the roof frame
- Pull the tent fabric over the structure
- Install the floor tray
Most grow tents take 10–20 minutes to assemble.
Step 2 – Install the Ventilation System
Ventilation is one of the most important parts of an indoor grow setup.
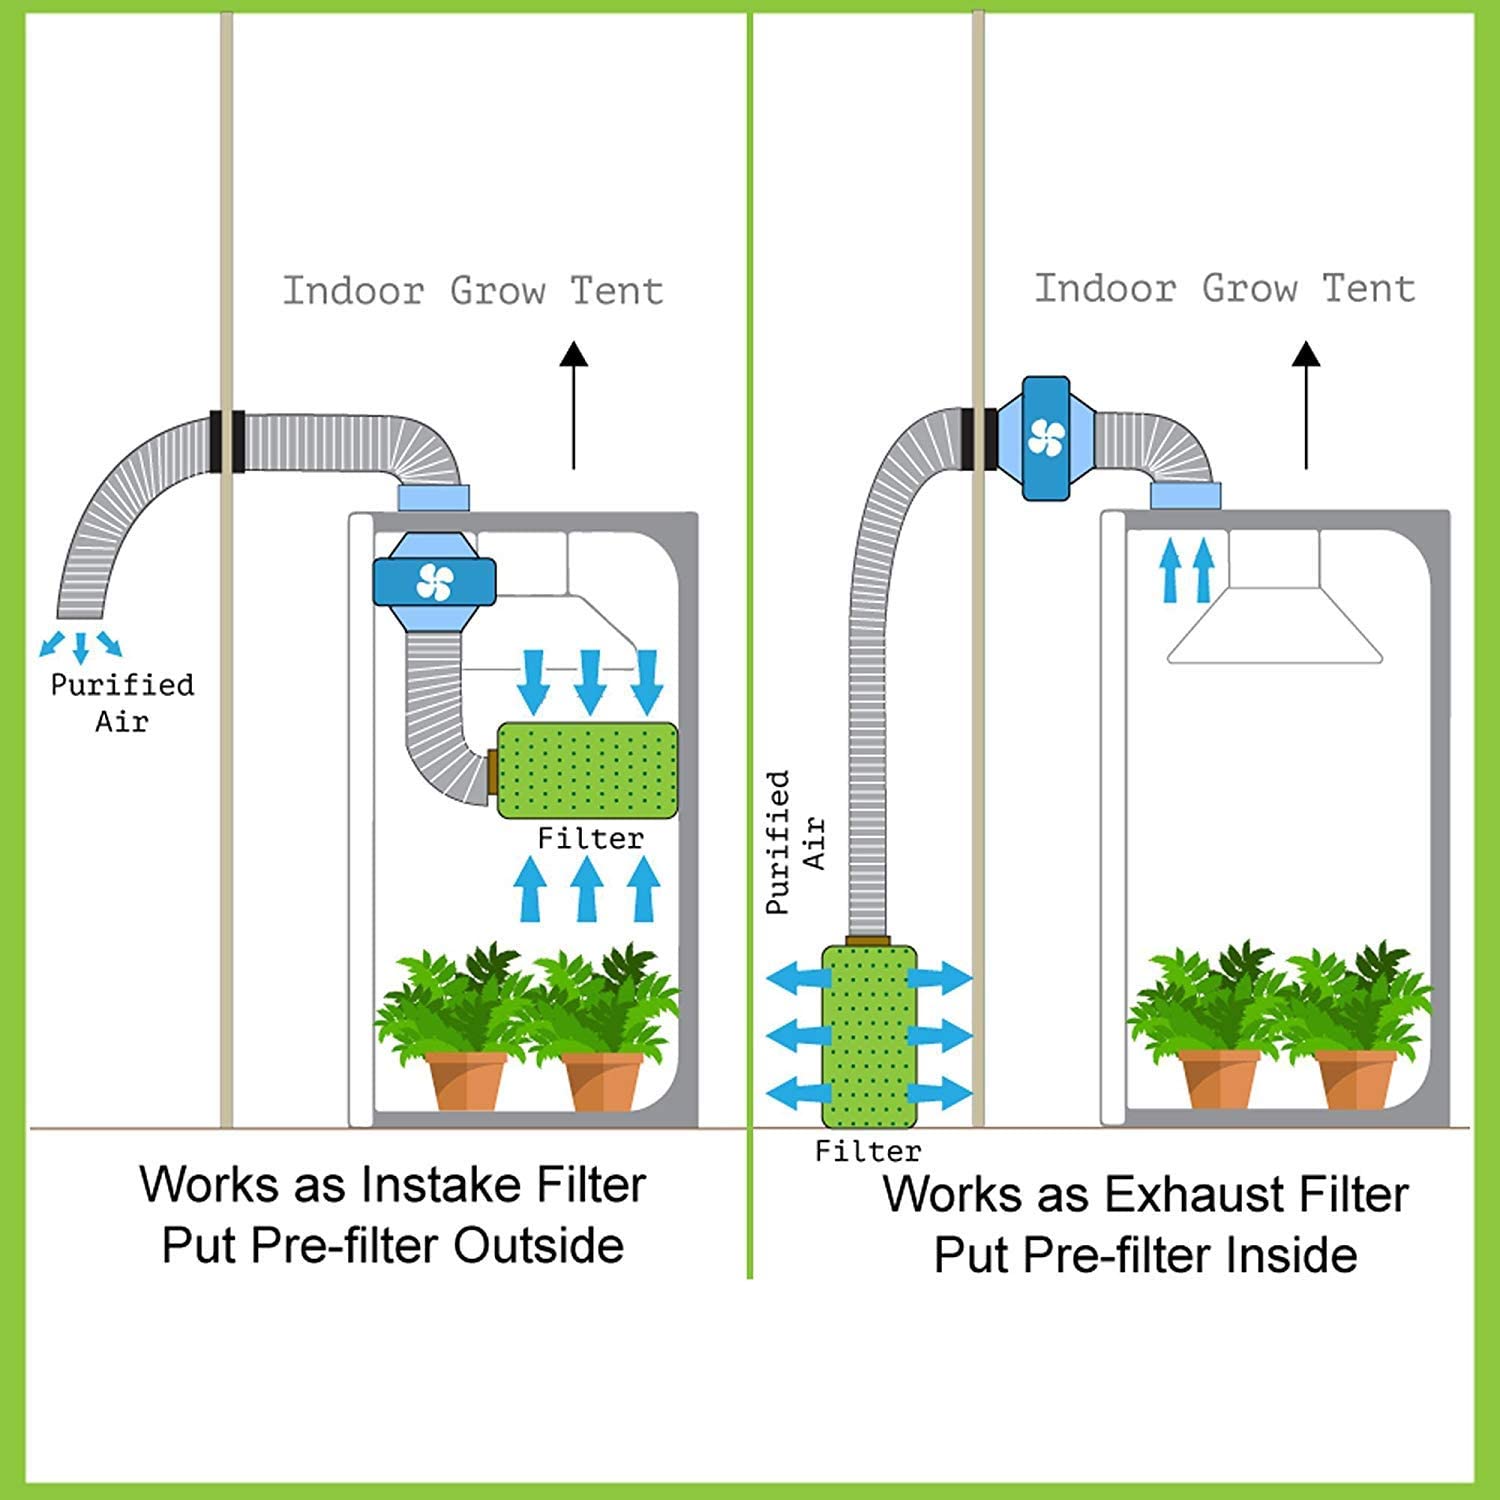

Typical airflow setup:
Carbon Filter → Inline Fan → Duct → Outside Tent
This system:
- Removes heat
- Controls humidity
- Eliminates odors
- Maintains fresh airflow
Beginner tip:
Place the carbon filter near the top of the tent, since hot air rises.
Step 3 – Hang the Grow Light
Grow lights are usually installed after ventilation to make installation easier.
How to hang grow lights:
- Attach adjustable ratchet hangers
- Hang the light from the tent crossbars
- Adjust height based on plant stage
Typical grow light distance:
| Growth Stage | Light Distance |
|---|---|
| Seedlings | 24–36 inches |
| Vegetative | 18–24 inches |
| Flowering | 12–18 inches |
LED grow lights are the most popular choice because they are:
- Energy efficient
- Low heat
- Full spectrum
Step 4 – Add Air Circulation Fans
Even with ventilation, plants still need air movement inside the tent.
Install 1–2 oscillating fans inside the tent to:
- Strengthen plant stems
- Prevent mold
- Improve CO₂ circulation
Aim the fans above or across the canopy, not directly at plants.
Step 5 – Install Monitoring Equipment
Environmental monitoring helps you maintain ideal conditions.
Recommended tools:
- Thermometer
- Hygrometer
- Light timer
- Smart grow controller (optional)
Ideal grow tent conditions:
| Stage | Temperature | Humidity |
|---|---|---|
| Seedling | 70–78°F | 60–70% |
| Vegetative | 70–85°F | 50–70% |
| Flowering | 65–80°F | 40–50% |
Step 6 – Place Plants and Grow Medium
Now your tent is ready for plants.
Choose your growing method:
Soil (Best for beginners)
Easy and forgiving.
Coco Coir
Better oxygen and faster growth.
Hydroponics
Fastest growth but requires experience.
Place plants evenly to ensure balanced light coverage.
Common Beginner Mistakes
Avoid these common grow tent mistakes:
1. Poor ventilation
Without airflow, plants suffer from heat stress and mold.
2. Lights too close
Too much light can burn plants.
3. Overwatering
The most common beginner mistake.
4. Ignoring temperature
High heat reduces plant growth.
Best Grow Tent Size for Beginners
If you’re just starting, these tent sizes work best:
| Tent Size | Plants | Recommended Light |
|---|---|---|
| 2×2 ft | 1–2 plants | 100–150W |
| 2×4 ft | 2–4 plants | 200–300W |
| 3×3 ft | 3–4 plants | 300–400W |
| 4×4 ft | 4–6 plants | 400–600W |
The 2×4 grow tent is one of the most popular beginner setups.
Final Thoughts
Setting up an indoor grow tent may seem complicated at first, but once everything is installed, maintaining your indoor garden becomes easy.
A good grow tent setup provides:
- Stable temperature
- Balanced humidity
- Strong lighting
- Proper airflow
With the right equipment and setup, beginners can successfully grow healthy plants indoors all year round.